Debian has fully integrated the files of MariaDB into the file system according to their function:
/usr/bin/
/usr/bin/mariadb.)/usr/lib/mysql/plugin//usr/share/mysql//etc/mysql//var/lib/mysql//run/mysqld/The files inside the directories mentioned before should not be
edited manually. The only exception is the configuration of MariaDB
under /etc/mysql/, if you know exactly how to proceed.
Otherwise use the MariaDB-CLI or a frontend like
phpMyAdmin.
After installation, as described in LAMP test server for developers, MariaDB is ‘open like a barn door to anyone’, because, by default, the two users root and anonymous are created (without password) as well as a test database.
Therefore we call the program
mysql_secure_installation in the root
terminal.
Here we make quite a few settings to secure the database. The necessary
entries are highlighted like this: \<- - [ ].
# mysql_secure_installation

In order to log into MariaDB to secure it, we'll need the
current password for the root user. If you've just
installed MariaDB, and you haven't set the root password
yet, the password will be blank, so you should just press
enter here.

Enter current password for root:        «--[Enter]
OK, successfully used password, moving on...

Setting the root password or using the unix_socket ensures
that nobody can log into the MariaDB root user without
the proper authorisation.

You already have your root account protected,
so you can safely answer 'n'.

Switch to unix_socket authentication [Y/n]:   «--[n]
 ... skipping.

You already have your root account protected,
so you can safely answer 'n'.

Change the root password? [Y/n]:   «--[y]
New password:             «--[mein_mariadb_root_passwort]
Re-enter new password:    «--[mein_mariadb_root_passwort]
Password updated successfully!
Reloading privilege tables..
... Success!

By default, a MariaDB installation has an anonymous user,
allowing anyone to log into MariaDB without having to
have a user account created for them. This is intended
only for testing, and to make the installation go a bit
smoother. You should remove them before moving into a
production environment.

Remove anonymous users? [Y/n]:   «--[y]
... Success!

Normally, root should only be allowed to connect from
'localhost'. This ensures that someone cannot guess at
the root password from the network.

Disallow root login remotely? [Y/n]   «--[y]
... Success!

By default, MariaDB comes with a database named 'test'
that anyone can access. This is also intended only for
testing, and should be removed before moving into a
production environment.

Remove test database and access to it? [Y/n]   «--[y]
- Dropping test database...
... Success!
- Removing privileges on test database...
... Success!

Reloading the privilege tables will ensure that all
changes made so far will take effect immediately.

Reload privilege tables now? [Y/n]   «--[y]
... Success!

Cleaning up...

All done! If you've completed all of the above steps,
your MariaDB installation should now be secure.

Thanks for using MariaDB!
As a result, the user root has received a (hopefully secure) password and can no longer log in remotely. The user anonymous and the database “Test” have been removed.
We reach the commandline interface in the terminal by typing
mariadb -u \<user\> -p. After
entering the password, we see the greeting and the new prompt
MariaDB [(none)]>.
# mariadb -u root -p
Enter password:
Welcome to the MariaDB monitor.  [...]

MariaDB [(none)]>
For security reasons we only log in as root at the
beginning to create the project database, a user for everyday work on
it, and a user to replace root.
Later in the phpMyAdmin
section, we revoke the root user’s all-encompassing privileges so that a
potential attacker will be unsuccessful at this point.
Create a database
We are still logged into the terminal and create a new database for our project:
MariaDB [(none)]> CREATE DATABASE sidu;
Query OK, 1 row affected (0.002 sec)
That’s all. If we want to delete this database, the required command
is DROP DATABASE sidu;.
Create a user
First we create our project user with the name tomtom and assign him exclusively all rights to the project database “sidu”:
MariaDB [(none)]> CREATE USER tomtom@localhost IDENTIFIED BY '<enter a password for tomtom here>';
Query OK, 0 rows affected (0.002 sec)

MariaDB [(none)]> GRANT ALL ON sidu.* TO tomtom@localhost;
Query OK, 0 rows affected (0.001 sec)
Now repeat the same procedure for the user chef, who should take over the task of root.
MariaDB [(none)]> CREATE USER chef@localhost IDENTIFIED BY '<enter a password for chef here>';
Query OK, 0 rows affected (0.002 sec)

MariaDB [(none)]> GRANT ALL ON *.* TO chef@localhost WITH GRANT OPTION;
Query OK, 0 rows affected (0.001 sec)

MariaDB [(none)]> FLUSH PRIVILEGES;
The new users differ in their rights.
tomtom has all rights only for the database “sidu”
(sidu.*).
chef has all rights to all databases (*.*) and users (WITH GRANT
OPTION).
So the user chef can take over the function of the
user root, and tomtom is the user for
work on our project database.
The logout is done by: \q.
MariaDB [(none)]> \q
Bey
#
Queries
We look at the result in a terminal, this time as user
chef.
First the users and then the existing databases:
MariaDB [(none)]> SELECT User,Host FROM mysql.user;
+-------------+-----------+
| User        | Host      |
+-------------+-----------+
| chef        | localhost |
| mariadb.sys | localhost |
| mysql       | localhost |
| phpmyadmin  | localhost |
| root        | localhost |
| tomtom      | localhost |
+-------------+-----------+
6 rows in set (0.002 sec)

MariaDB [(none)]> SHOW DATABASES;
+--------------------+
| database           |
+--------------------+
| information_schema |
| mysql              |
| performance_schema |
| phpmyadmin         |
| sidu               |
+--------------------+
5 rows in set (0.001 sec)
If we log out of MariaDB and log back in as user tomtom, the two queries look like this:
MariaDB [(none)]> SELECT User,Host FROM mysql.user;
ERROR 1142 (42000): SELECT command denied to user 'tomtom'@'localhost' for table 'user'.

MariaDB [(none)]> SHOW DATABASES;
+--------------------+
| Database           |
+--------------------+
| information_schema |
| sidu               |
+--------------------+
2 rows in set (0.001 sec)
It is easy to see that the user tomtom does not get access to system relevant data.
As seen before, MariaDB can be administered completely via the command line. If you know the syntax, which requires profound knowledge, you will quickly get the desired result this way.
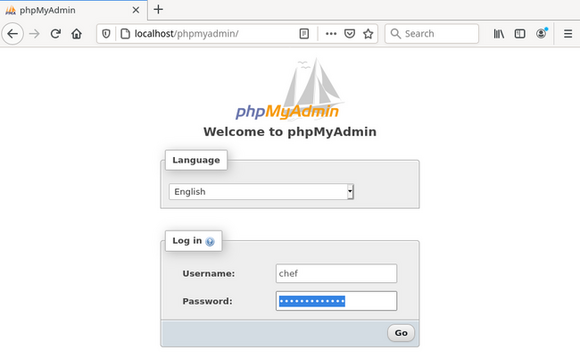
We use the programm phpMyAdmin, which is more suitable
for less experienced users, and enter:
http://localhost/phpmyadmin/
into the browser address bar. If we have already gone through the
configuration according to the manual page LAMP - Apache, the
call is:
https://server1.org/phpmyadmin/
To remove the rights of the database admin root, as mentioned above, we use our new database admin chef with his password in the login window right away.
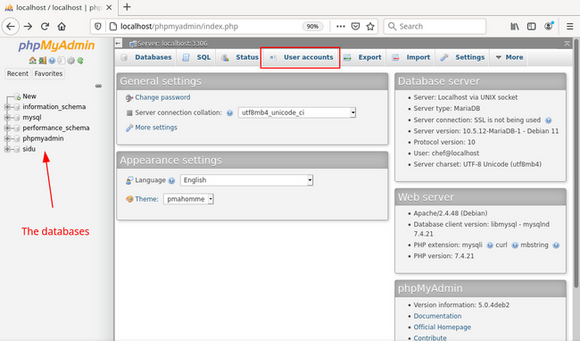
In the start window we see all databases in the left column. Then we select the tab “User accounts” in the center area.
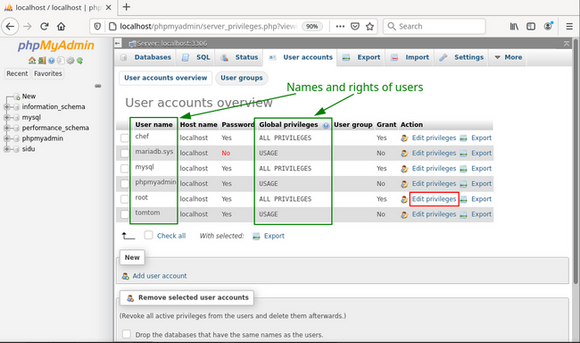
The user accounts overview shows all users and their rights in short form. Here we select the switch “Edit privileges” for the root user.
Now we see the detailed permissions for the root user. Here we first remove all his rights (1a), then, in the area “Administration”, grant the right “Super” (1b), and execute the action by clicking the “OK” button at the very bottom right of this page (not visible in the screenshot).
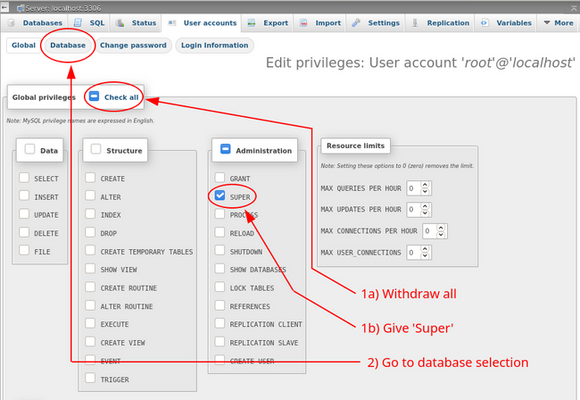
Afterwards we go to the next page via the “Database” button (2).
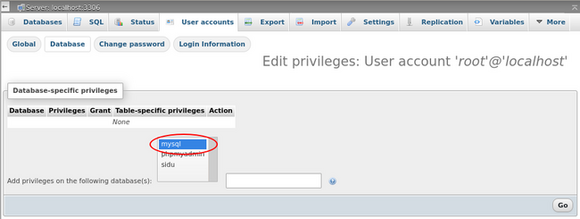
After selecting the database “mysql” and “OK”, a window opens with the detailed rights to the database “mysql” for the user root.
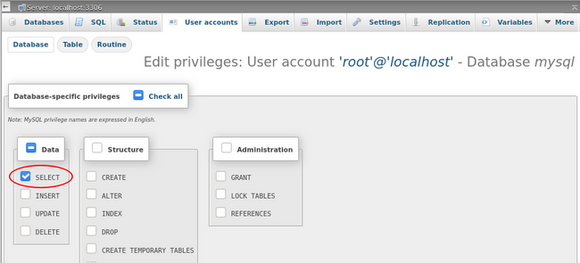
Only choose the method “SELECT”. A click on “OK” executes the sql command.
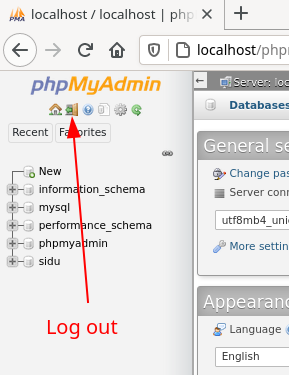
So we are done and leave phpMyAdmin via the door icon placed in the left column.
phpMyAdmin offers extensive possibilities for the administration of databases, their tables, and their contents. Note the “Export” tab in the main window, behind which you will find the option to backup data.
The control of MariaDB has been integrated into Systemd in Debian, and thus also in siduction. MariaDB starts automatically when the server is booted. The control calls are:
# systemctl [start | stop | restart] mariadb.serviceStartup and error messages of the server are logged in the systemd
journal.
Detailed information is available on the external web page MariaDB Systemd.
When searching the Internet for MariaDB’s control panel, make sure that the search results refer to Systemd.
The Systemd Journal contains messages about the startup process of
the mariadb.service. It is the first place to go to when
errors occur.
In the console, the command journalctl displays the
messages about MariaDB with:
journalctl -n 25 -u mariadb.service(here the last 25 lines)
Or continuously with:
journalctl -f -u mariadb.serviceIn addition, you can switch on the logging of sql actions in the MariDB CLI like this:
MariaDB [(none)]> SET GLOBAL general_log=1;This creates a log file with the pattern
<host>.log in the directory
/var/lib/mysql/.
Caution: This is an absolute performance killer and
only meant to monitor actions in the short term.
MariaDB
Documentation
MariaDB Systemd
and the manpage
man mariadb