This manual page is based on Apache 2.4.46.
According to our example from the installation guide, we want to set
up a LAMP test server for developers that is directly connected
to the workstation PC via LAN. Beyond that, for security reasons, there
should be no connection for the server to a local network or even to the
Internet.
The only exception is that the server will be connected to the Internet
temporarily and exclusively for system and software updates via a second
network interface.
Debian has fully integrated the Apache files into the file system according to their function:
/usr/sbin//usr/lib/apache2/modules//usr/share/apache2//etc/apache2//var/www/html//run/apache2/,
/run/lock/apache2//var/log/apache2/It is important to distinguish between the variables
ServerRoot and DocumentRoot.
ServerRoot is the configuration directory,
i.e. /etc/apache2/.
DocumentRoot contains the web page data, so
/var/www/html/.
The connection between the test server and the PC is placed in the IPv4 network segment 192.168.3.xxx, while the PC’s Internet connection is outside this network segment. The data used are:
server
IP: 192.168.3.1/24
name: server1.org
alias: www.server1.org
PC
IP: 192.168.3.10/24
name: pc1
We make a backup copy of the */etc/hosts* file on the
server and on the PC and add the necessary lines to both.
server */etc/hosts*:
cp /etc/hosts /etc/hosts_$(date +%f)
echo "192.168.3.1 server1.org www.server1.org" >> /etc/hosts
echo "192.168.3.10 pc1" >> /etc/hosts
PC */etc/hosts*:
cp /etc/hosts /etc/hosts_$(date +%f)
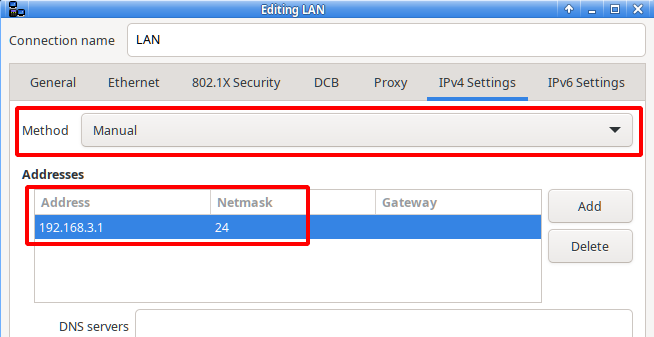
echo "192.168.3.1 server1.org www.server1.org" >> /etc/hostsNext, in NetworkManager, we enter the data for the server in the fields outlined in red. The method is changed from “Automatic (DHCP)” to “Manual” and in the address fields we enter the values mentioned at the beginning.
Additionally, in the tab “General”, the option
“Automatically connect with priority” should be
activated.
Accordingly, we set the appropriate settings on the PC for the used LAN
interface.
On the PC, we test the connection in the console with
$ ping -c3 www.server1.organd, if successful, we immediately check the function of Apache by entering http://www.server1.org/index.html in the address line of the web browser.
The Apache welcome page with “It works!” should appear.
The configuration files and directories are located in the
ServerRoot directory /etc/apache2/.
The central configuration file is apache2.conf. It is
usually not edited because many configurations are in separate files.
Activation and deactivation is done via sym links. This has the
advantage that a number of different configurations are available and
only the required ones are included.
The configuration files are text files, which are created or edited with an editor and root permissions. The name of the file may be arbitrary, but the file extension must be “.conf”. The valid directives that may be used in the configuration files are described in detail in the Apache documentation.
The files are located in the directories
/etc/apache2/conf-available,
/etc/apache2/mods-available, and
/etc/apache2/sites-available.
Your activation links can be found in
/etc/apache2/conf-enable,
/etc/apache2/mods-enable, and
/etc/apache2/sites-enable.
To enable or disable a “.conf” file, we use
a2enconf and a2disconf. This creates or
removes the activation links. The command
a2enconf NAME_OF_FILE.conf activates the configuration. Deactivation is done accordingly with:
a2disconf NAME_OF_FILE.conf We proceed in the same way for modules and virtual hosts with the
commands a2enmod, a2ensite and
a2dismod, a2dissite.
The Apache web server reads the changed configuration with the command
systemctl reload apache2.serviceNow we return to our LAMP test server for developers and adjust the configuration to the server data.
/etc/apache2/apache2.conf file
It is one of the few exceptions for editing the
apache2.conf. We add the following line at the beginning of
the “Global configuration” section:
ServerName 192.168.3.1This tells the Apache web server the IP address where the development project should be reachable and suppresses redirections to IP 127.0.1.1 with error messages.
New sites file
With the text editor of our choice, we create the file
/etc/apache2/sites-available/server1.conf, e.g.
mcedit /etc/apache2/sites-available/server1.confThen we insert the following content, save the file, and exit the editor.
<VirtualHost *:80>
ServerName server1.org
ServerAlias www.server1.org
ServerAdmin webmaster@localhost
DocumentRoot /var/www/html
ErrorLog ${APACHE_LOG_DIR}/error_server1.log
CustomLog ${APACHE_LOG_DIR}/access_server1.log combined
</VirtualHost>
Then we change the configuration to the new VirtualHost and announce the changes to the Apache web server:
# a2ensite server1.conf
   Enabling site server1.
[...]

# a2dissite 000-default.conf
   Site 000-default disabled.
[...]

systemctl reload apache2.serviceThe Apache web server runs with the USER.GROUP
www-data.www-data” and DocumentRoot belongs to
“root.root” immediately after installation.
To give users write permissions to the files contained in
DocumentRoot, a new group should be created specifically
for this purpose. It does not make sense to use the existing group
www-data because Apache runs with the rights of this
group.
We name the new group work.
With CMS
If a content management system (software for collaborative editing of
website content) is added, we prepare DocumentRoot
accordingly:
Create the group and assign it to the user.
groupadd work
adduser USERNAME work
chgrp work /var/www/html
To activate the new permissions you have to log out and log in again,
or use the newgrp command as user.
$ newgrp workSet SGID bit for DocumentRoot
so that all added directories and files inherit the group
work.
chmod g+s /var/www/htmlAdjust owner and file permissions
so that unauthorized people don’t get access and the Apache web server
runs properly.
Let’s look at the current permissions:
# ls -la /var/www/html
total 24
drwxr-sr-x 2 root work 4096 Jan 9 19:32 .
             (DocumentRoot with SGID bit)
drwxr-xr-x 3 root root 4096 Jan 9, 19:04 ...
             (The parent directory /var/www)
-rw-r--r-- 1 root work 10701 9 Jan 19:04 index.html
-rw-r--r-- 1 root work 20 Jan 9, 19:32 info.php
For DocumentRoot we change the owner to
“www-data”, give write permission to the group, and revoke read
permission from everyone else as well (all recursively).
chown -R www-data /var/www/html
chmod -R g+w /var/www/html
chmod -R o-r /var/www/html
We check the result again.
# ls -la /var/www/html
total 24
dr-xrws--x 2 www-data work 4096 Jan 9 19:32 .
drwxr-xr-x 3 root root 4096 Jan 9 19:04 ...
-rw-rw---- 1 www-data work 10701 9 Jan 19:04 index.html
-rw-rw---- 1 www-data work 20 9 Jan 19:32 info.php
Now only members of the group work have write permission in
DocumentRoot. Apache web server can read and write the
files, all others are denied access.
Disadvantages of these settings
When creating new directories and files below
DocumentRoot, the owner is the respective
user and not www-data. This prevents the
Apache web server from reading the files.
The solution is a Systemd Path Unit, which monitors changes
below DocumentRoot and adjusts the owner and file
permissions. (See the example in the Systemd-Path manual
page.)
Without CMS
For static websites, a content management system is often not
necessary and only constitutes another security risk and increased
maintenance effort. In addition to the settings made before, the write
permission to DocumentRoot can be revoked from the Apache
web server to strengthen security because in case an attacker finds a
hole in Apache, this will not give him write permission to
DocumentRoot.
chmod -R u-w /var/www/htmlImportant safeguards are already included in the file
/etc/apache2/apache2.conf by default.
The following three directives prevent access to the root file system and then release the two directories used by the Apache web server, “/usr/share” and “/var/www”.
<Directory />
    Options FollowSymLinks
    AllowOverride None
    Require all denied
</directory>

<Directory /usr/share>
    AllowOverride None
    Require all granted
</directory>

<Directory /var/www/>
    Options Indexes FollowSymLinks
    AllowOverride None
    Require all granted
</directory>
The options “FollowSymLinks” and “Indexes” constitute a security risk and should be changed unless absolutely necessary. See below.
The following directive disables the display of the files
.htaccess and .htpasswd.
<FilesMatch "^\.ht">
    Require all denied
</FilesMatch>In the file /etc/apache2/apache2.conf:
FollowSymLinks may cause content outside
DocumentRoot to be listed.
Indexes lists the contents of a directory if there is
no index.html or index.php, etc..
It is recommended to remove “FollowSymLinks” and place all the project data below “DocumentRoot”. For the “Indexes” option, the entry has to be changed to
Options -Indexesif the display of the directory contents is not
desired.
Alternatively, create an empty index file in the directory that
is delivered to the client in place of the directory contents. For
example, for the upload directory:
$ echo "<!DOCTYPE html>" > /var/www/html/upload/index.html
     or
$ echo "<?php" > /var/www/html/upload/index.php
In the host configuration
/etc/apache2/sites-available/server1.conf
we can use the <Directory> block to block all IP
addresses except those listed in it.
<Directory "/var/www/html">
    Order deny,allow
    Deny from all
    Allow from 192.168.3.10
    Allow from 192.168.3.1
</directory>
Merging the configuration:
The directives of the configuration are spread over a number of files
within ServerRoot and the .htaccess files in
DocumentRoot. It is therefore particularly important to
know where to place the directive to achieve the desired effect.
We strongly recommend to consult the web page
apache.org
- How the sections are merged
intensively.
The owner of DocumentRoot
is “root.root” after installation and should be changed. See the chapter users and permissions.
Without HTTPS no website project can be launched today.
How to obtain a certificate is described, for example, in detail and in
an easy-to-understand manner on the website wpbeginner.
First we create the necessary folders inside
DocumentRoot:
cd /etc/apache2/
/etc/apache2/# mkdir ssl ssl/certs ssl/private
In these we put the certificate file server1.org.crt and
the private key server1.org.key.
Then we secure the directories against unauthorized access.
/etc/apache2/# chown -R root.root ssl
/etc/apache2/# chmod -R o-rwx ssl
/etc/apache2/# chmod -R g-rwx ssl
/etc/apache2/# chmod u-w ssl/certs/server1.org.crt
/etc/apache2/# chmod u-w ssl/private/server1.org.key
Finally, we use the ls command to check:
/etc/apache2/# ls -la ssl
   total 20
   drwx------ 5 root root 4096 Jan 25 18:17 .
   drwxr-xr-x 9 root root 4096 Jan 25 18:43 ...
   drwx------ 2 root root 4096 Jan 25 18:16 certs
   drwx------ 2 root root 4096 Jan 25 18:16 private

/etc/apache2/# ls -l ssl/certs
-r-------- 1 root root 1216 25 Jan 15:27 server1.org.crtThe Apache documentation contains a recommended page with various
security tips.
apache.org
- Security Tips
In addition, there are numerous tips on the Internet for the secure operation of the Apache web server.
Regular checking of the log files in
/var/log/apache2/ helps to detect errors or security
holes.
If the server is connected to the local network or to the Internet in a different way than intended in this manual page, a firewall is essential.
The ssl module is activated in Apache by default. It is enough to
edit the file
/etc/apache2/sites-available/server1.conf.
Insert a new VirtualHost directive at the beginning. This redirects incoming client requests from port 80 to port 443 (ssl) using “Redirect”.
Rewrite the previous VirtualHost directive to port 443.
Add the SSL directives after the standard host directives.
In case our web project should contain dynamically generated web pages, the last two “FileMatch” and “Directory” directives need to be inserted with the “SSLOptions” directive.
The extended server1.conf then has the following
content:
<VirtualHost *:80>
    ServerName server1.org
    ServerAlias www.server1.org
    Redirect / https://server1.org/
</VirtualHost>

<VirtualHost *:443>
    ServerName server1.org
    ServerAlias www.server1.org
    ServerAdmin webmaster@localhost
    DocumentRoot /var/www/html
    ErrorLog ${APACHE_LOG_DIR}/error_server1.log
    CustomLog ${APACHE_LOG_DIR}/access_server1.log combined

    SSLEngine on
    SSLProtocol all -SSLv2 -SSLv3
    SSLCertificateFile /etc/apache2/ssl/certs/server1.org.crt
    SSLCertificateKeyFile /etc/apache2/ssl/private/server1.org.key

    <Directory "/var/www/html">
        Order deny,allow
        Deny from all
        Allow from 192.168.3.10
        Allow from 192.168.3.1
    </directory>

    <FilesMatch "\.(cgi|shtml|phtml|php)$">
        SSLOptions +StdEnvVars
    </FilesMatch>

    <Directory /usr/lib/cgi-bin>
        SSLOptions +StdEnvVars
    </Directory>
</VirtualHost>
In case our finished project is to be located at a hoster without
access to ServerRoot (this is the rule), we can add a
rewrite statement to the .htaccess file in
DocumentRoot or create the file with the rewrite
statement.
<IfModule mod_rewrite.c>
RewriteEngine On
RewriteCond %{HTTPS} !=on
RewriteRule ^ https://%{HTTP_HOST}%{REQUEST_URI} [L,R=301]
</IfModule>apache.org -
Documentation
apache.org
- Configuration files
apache.org -
SSL Howto
Let’s Encrypt - A nonprofit
Certificate Authority