A terminal, also called a console, is a program that allows you to interact directly with the GNU/Linux operating system through directly executed commands. The terminal, also often called the “shell” or “command line”, is an extremely powerful tool and it is well worth the effort to learn the basics of its use.
In siduction, you can invoke the terminal/console by clicking on the PC monitor icon to the right of the menu, or by going to “Menu” > “System” > “Terminal”, or, even easier, by typing “kons” or “term” into the menu search bar.
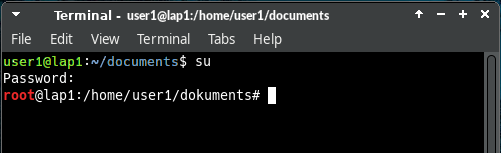
After calling the terminal, you will see the prompt:
username@hostname:~$username in the above example corresponds to the
username of the logged in user. The tilde ~ shows that you
are in your home directory /home/username, and the dollar
sign (the prompt) $ means you are logged into the terminal
with limited user privileges. At the end, the cursor is blinking. All
this is the command line. This is where you enter commands that you want
the terminal to execute.
Many commands can only be executed with root rights,
i.e. administrator rights. root rights can be obtained by typing
su and pressing
Enter. After that you have to enter the
root password. The password is not displayed on the screen during the
input. (See below work-as-root.)
If the input is correct, the command line now shows:
root@hostname:/home/username#Note that the dollar sign $ has been replaced by a hash
#. In a terminal, the hash # always means that
you are logged in with root privileges.
When command line commands are specified in the manual, the information
before the prompt ($ or #) is omitted. A command like:
# chmod g+w <file>means: you open a terminal, log in as root
(su) and execute the command in a root
prompt #. The hash is not included.
Another note:
For users who are new to the terminal, it is often confusing if no
message appears after executing a command, but only the empty prompt
again. This is intentional and means that the command was executed
without errors. (In the example above, the group members were given
write permissions to the <file>.)
Caution
While logged into the terminal with root
privileges, you are allowed to do anything, e.g. delete files, without
which the operating system will stop working, and so on. When working
with root privileges, you must be aware of what you are doing
because it is easily possible to cause irreparable damage to the
operating system.
It must be taken into account that all actions, if provided for in
the program, are also executed with root privileges.
The simple copy command
cp <source> <destination> in a
user directory leads to files with the owner root in
the destination directory. This is probably not intended and also not
useful.
Therefore: Work as root only where it is really necessary!.
About su
A number of commands must be started with root
privileges. These rights can be obtained by entering
su. After entering the correct password
the root prompt appears.
$ su
Password:
#
Now it is possible to execute all commands in the terminal and start all programs that require root privileges. You can exit this state by typing
# exit
$
and the prompt for the user appears again.
About su-to-root
In contrast to the general command su, su-to-root allows
the execution of programs with graphical user interface with
root privileges. su-to-root transfers X
properties to the target user using su. The command is:
su-to-root -X -c <program>If error messages related to dbus occur, expand the input:
su-to-root -X -c 'dbus-launch <program>'Another terminal opens, into which the root password is to be
entered. If successful, the desired program will launch with
root privileges.
Examples of using graphical applications via su-to-root are: editing a
configuration file with a text editor, using the partition manager
gparted, or using file managers like dolphin or
thunar.
Use in desktop environments:
su in the terminal, if
necessary.Under no circumstances should productive programs that are normally started with user rights be booted as root with this option: Internet browsers, e-mail programs, office programs, etc.
sudo is not configured
sudo is only available in live mode, because no root password is set
there.
After an installation sudo is not enabled. The reason
is: If an attacker grabs the user password, he does not yet gain
super-user privileges and cannot make any harmful changes to the
system.
Another problem with sudo is that a root application running with the
user configuration can change permissions and thus make them unusable
for the user. The use of su or
su-to-root is recommended!
If you want to use sudo despite all warnings, you have to add the
corresponding $user to the sudo group!
This can be done with the command
adduser <USER> <GROUP> as
root.
As a slim alternative to sudo we recommend doas. The
manual page Doas -
Alternative to Sudo explains the advantages of doas and the doas
configuration.
Colored prompts on the terminal can save you from unpleasant or
catastrophic errors if you are root # and perform a
task you meant to do as user $.
That’s why in siduction, by default, the user $’s
prompt is green, blue, and white, and root #’s prompt
has the word “root” displayed in red.
The focus when working with the terminal should be on the input and output of the commands and not on colored prompts. In siduction we nevertheless decided to use the colors to give users a warning when they are system administrators with root privileges.
Change prompt color
Before changing the configuration file, we first create a backup copy in the terminal with a date stamp.
$ cp ~/.bashrc ~/.bashrc_$(date +%F)Then we open the file ~/.bashrc with a text editor of
our choice (e.g.: kate, gedit, mcedit, vim, …) and look for the
following line, which is located approximately in the middle of the
file:
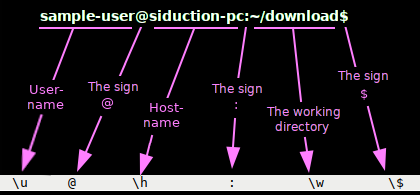
PS1='${debian_chroot:+($debian_chroot)}\[\033[01;32m\]\u@\h\[\033[00m\]:\[\033[01;34m\]\w\[\033[00m\]\$ 'The font and color code are immediately followed by the promt parts that are to receive this representation. The following figure shows the relation between the prompt parts and their abbreviations.
The following table explains the values of the syntax “[\033[01;32m]”, where the bold part determines the font attributes and the color.
| font code | font attribute | color code | color |
|---|---|---|---|
| 00m | Default for font and color | ||
| 00;XX | default font | XX;m | default color |
| 01;XX | bold | XX;30 | black |
| 02;XX | dark | XX;31 | red |
| 03;XX | italic | XX;32 | green |
| 04;XX | underlined | XX;33 | yellow |
| 05;XX / 06;XX | flashing | XX;34 | blue |
| 07;XX | block, inverted | XX;35 | magenta |
| 08;XX | background color (invisible) | XX;36 | cyan |
| 09;XX | strikethrough | XX;37 | white |
The “PS1” line quoted above is therefore displayed as follows:
| font code | prompt parts and their display |
|---|---|
| [01;32m]\u@\h | user, @ and host get the attributes “bold” and “green” |
| [00m]: | colon gets the default attributes of the terminal |
| [01;34m]\w | the working directory gets the attributes “bold” and “blue” |
| [00m]$ | the prompt gets the default attributes of the terminal |
If the color is to be removed from the prompt, we prefix the PS1 line with a hash # and a space. This comments out the line. Now it is sufficient to add the line
PS1='${debian_chroot:+($debian_chroot)}\[\033[00m\]\u@\h:\w\$ 'immediately as the next line.
If the color is to be changed in the prompt, the color coding must be adjusted for each part of the prompt.
PS1='${debian_chroot:+($debian_chroot)}\[\033[03;32m\]\u@\h\[\033[01;34m\]:\w\[\033[00m\]\$ 'This code example creates a prompt in which username @ hostname is green and italicized; the : and the working directory are blue and bold; the $ character and the command prompt are given the contrasting color to the background of the terminal.
The new colors and formats appear after opening a new terminal.
Color settings of the terminal
In the terminal menu, under “Edit” - “Settings…” - tab “Colors”, there are a ton of setting options. We recommend a rather plain setting.
Sometimes a terminal can no longer respond as desired. This is usually because a program has terminated with an error and left the terminal in an abnormal state. Then
resetmust be entered and the Enter key must
be pressed.
If the output of a terminal appears distorted, this can usually be
fixed by pressing
Ctrl+l, this
will rebuild the terminal window. Such distortions usually occur when
working with programs that use an ncurses interface, for example
cgdisk.
A terminal may appear frozen, but this is usually not the case; input
continues to be processed even if it does not appear to be so. This can
be caused by accidentally pressing
Ctrl+s. In
this case,
Ctrl+q can
be tried to free the console again.
Most commands/programs have command line help and also instructions. The are called “man page” or “manual page”. The syntax to call the man page is:
$ man <command>or
$ man -k <keyword>This calls the man page of a command. Navigation in the man pages is
done by the arrow keys and they can be terminated with
q for quit. Example:
$ man apt-getTo exit a man page, type q.
Another useful tool is the apropos command. apropos
allows you to search the man pages for a command if, for example, you
forget the syntax. Example:
$ apropos apt-This lists all commands for the package manager apt. apropos is a powerful tool, for more in-depth information about apropos enter
$ man aproposA very good introduction to the BASH console can be found at linuxcommand.org.
Of course you can also use your favorite search engine to find more.
Burning CD, DVD, and BD.
The command line programs are the basis for popular GUI programs like
K3b, Brasero, or Xfburn.
Those who prefer the full range of options provided by the command line
programs cdrdao, wodim,
growisofs, etc. use the terminal. Our manual page Burn
DVD without GUI contains many examples and tips to detect available
hardware, compile data, and then burn it to CD, DVD, and BD.
A console script is a convenient way to bundle several commands into one file. Entering the filename of the script executes the commands that are in the script. siduction comes with some very useful scripts that provide simplifications to system administration.
A script is started in the console as follows, if you are in the same directory:
./name_of_scriptSome scripts require root access, depending on the scope of the script.
Installation and execution
Use wget to load a script onto the machine. It is best
to place it in the recommended directory, for example in
/usr/local/bin. To copy and paste in the console, the mouse
can also be used after gaining root privileges with su.
Example with wget and root privileges
$ su
password:
# cd /usr/local/bin
# wget -c ftp://<remote_server>/script-name.sh
After that, the file must be made executable:
# chmod +x script-name.shSince the directory /usr/local/bin is included in the
search path of root, this simple command is sufficient
to start the script:
# script-name.shThe file can also be loaded onto the computer with a browser and moved to the appropriate location, but it must be made executable even then.
Example with wget as user
This is how to save a file in $HOME (the prompt is ‘$’)
as a user:
$ wget -c ftp://<remote_server>/user-script-name.sh
$ chmod +x user-script-name.sh
The script is started like this:
$ ./user-script-name.shOf course, this will only work as user if the script does not contain any commands that require root privileges.