fdisk and cfdisk create MBR partition tables based on the BIOS. The introduction of GPT partition tables based on UEFI began in 2000.
The newer Globally Unique Identifier Partition Table (GPT) standard, which is part of the UEFI standard, has replaced MBR on current hardware and allows disks/partitions larger than 2 TBytes and a theoretically unlimited number of primary partitions. More information about this can be found in Wikipedia GUID partition table.
We recommend to use fdisk and cfdisk only for
partitioning on older hardware.
For creating GPT partition tables, please refer to the manual page Partitioning with
gdisk.
Please NOTE:
siduction uses UUID in fstab for storage device naming.
Please refer to the chapter Naming by
UUID.
Disks
Information about the devices can be easily obtained from an information window (pop-up) by hovering the mouse over the icon of a device on the desktop. This works both from the live ISO and with siduction installed.
We recommend creating a table (manual or generated) that contains the
details of all devices. This can be very helpful if problems arise. In a
terminal, we become root with
su and type
fdisk -l. For example, with two disks, we
get output similar to that shown below.
user1@pc1:/$ su
password:
root@pc1:/# fdisk -l

Disk /dev/sda: 149.5 GiB, 160041885696 bytes, 312581808 sectors
Disk model: FUJITSU MHY2160B
Units: sectors of 1 * 512 = 512 bytes
Sector size (logical/physical): 512 bytes / 512 bytes
I/O size (minimum/optimal): 512 bytes / 512 bytes
Disklabel type: dos
Disk identifier: 0x6513a8ff

Device   Boot   Start       End   Sectors Size Id Type
/dev/sda1        2048  41945087  41943040  20G 83 Linux
/dev/sda2    41945088  83888127  41943040  20G 83 Linux
/dev/sda3    83888128  88291327   4403200 2,1G 82 Linux swap
/dev/sda4    88291328 312581807 224290480 107G  5 Extended
/dev/sda5    88293376 249774079 161480704  77G 83 Linux
/dev/sda6   249776128 281233407  31457280  15G 83 Linux
/dev/sda7   281235456 312581807  31346352  15G 83 Linux


Disk /dev/sdb: 119,25 GiB, 128035676160 bytes, 250069680 sectors
Disk model: Samsung SSD 850
Units: sectors of 1 * 512 = 512 bytes
Sector size (logical/physical): 512 bytes / 512 bytes
I/O size (minimum/optimal): 512 bytes / 512 bytes
Disklabel type: dos
Disk identifier: 0x000403b7

Device   Boot  Start       End   Sectors  Size Id Type
/dev/sdb1       2048  17831935  17829888  8.5G 82 Linux swap
/dev/sdb2   17831936 122687487 104855552   50G 83 Linux
/dev/sdb3  122687488 250068991 127381504 60,8G 83 Linux
By entering the command
fdisk -l > /home/<MY USER NAME>/documents/fdisk-l_output
we get a text file with the same content.
Partitions
The partitions on an MBR hard disk are defined by a number between 1 and 15. A maximum of 14 mountable partitions is possible.
The following partition types exist:
primary, extended, and logical.
The logical partitions are located within the extended partition. A
maximum of four primary or three primary and one extended partition can
be created. The extended partition, in turn, can contain up to eleven
logical partitions.
Primary or extended partitions are given a designator between 1 and 4
(for example sda1 to sda4). Logical partitions are always bundled and
part of an extended partition. A maximum of eleven logical partitions
can be defined with libata, and their names start with number 5
and end with number 15 at most.
Examples
4 partitions (all primary):

|sda1|sda2|sda3|sda4|


6 partitions (3 primary, 1 extended, and 3 logical):

|sda1|sda2|sda3|-
                 |       contains only
               |sda4| -> references to
                 |       logical partitions
                 |
               |sda5|sda6|sda7|
/dev/sda5 can only be a logical partition (in this case the first logical one on this device). It is located on the first hard disk of the computer (depending on the BIOS configuration).
/dev/sdb3 can only be a primary or extended partition. The letter “b” indicates that this partition is on a different device than the partition of the first example, which contains the letter “a”.
There is a risk of data loss when using any partition editor. Always back up data you want to keep on another disk first.
cfdisk is started in a console as
root (after su the root
password is required):
user1@pc1:/$ su
password:
root@pc1:/#
cfdisk /dev/sda
cfdisk should only be used on a hard disk with all partitions unmounted. All data will be lost when the changed partition table is written.
The user interface
On the first screen, cfdisk shows the current partition
table with the names and some information about each partition. At the
bottom of the window, there are some command buttons. To switch between
partitions, use the arrow keys up and
down. To select commands, use the arrow
keys right and
left. The
Enter key is used to execute the
command.
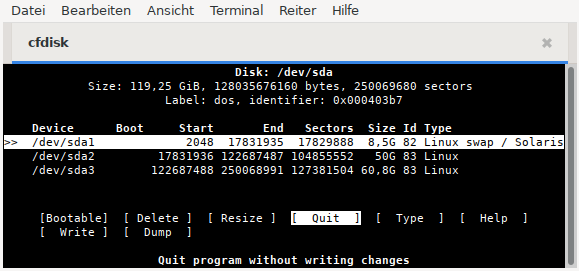
We have three partitions on the example disk.
| Device | Part. Size | Part. Type | Mountpoint |
|---|---|---|---|
| /dev/sda1 | 8.5G | 82 Swap | - |
| /dev/sda2 | 50.0G | 83 Linux | / |
| /dev/sda3 | 60.8G | 83 Linux | /data |
From the data partition, we want to move the directories
Pictures and Music to their own partitions and
create more space for them. At the same time, they should be accessible
for a Windows system residing on another harddisk. The root partition is
oversized with 50 GB and will be reduced.
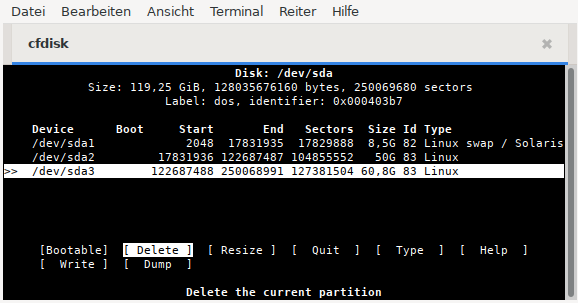
Delete a partition
To create space, we delete the data partition and then shrink the root partition.
To delete the partition /dev/sda3, highlight it with
the up-down keys and select the command “Delete” with the
left-right arrow keys. Finally, confirm the action by hitting
Enter.
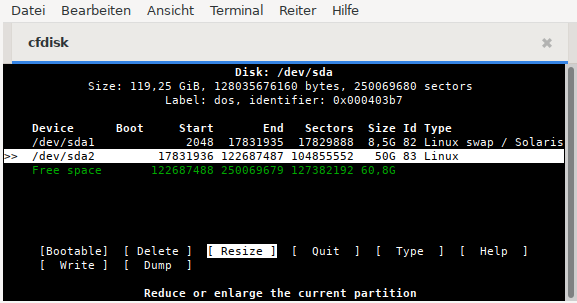
Resize a partition
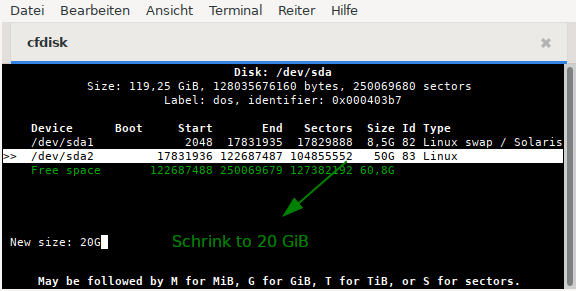
Highlight the partition /dev/sda2, select the command “Resize”, and confirm.
Then the new size of “20G” is to be entered.
Creating a new partition
The hard disk’s freed space is highlighted. The command selection automatically jumps to “New”, which has to be confirmed.
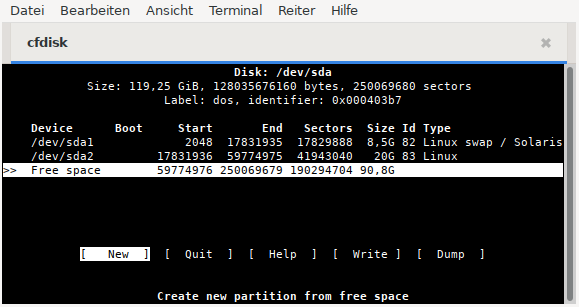
Then enter the new size of “15G” for the data partition.

Now we have to choose between a primary or an extended partition. We select a primary partition.

After that, we mark the free disk space again, confirm it, and
confirm the preset total size as well. In the following selection,
extended has to be chosen. This creates the extended
partition (here called “container”) in which the two additional
partitions are to be created.
Finally, the partitions for Music and Images
are to be created in the desired size according to the procedure shown
above. Since only logical partitions are possible, the selection between
primary and extended partition is omitted.
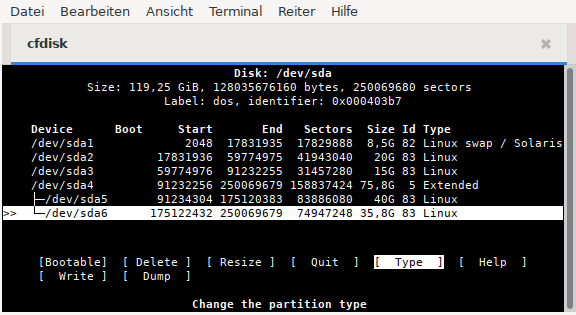
This is how the result looks like.
Partition type
To change the type of a partition, select the desired partition and
choose the command “Type”.
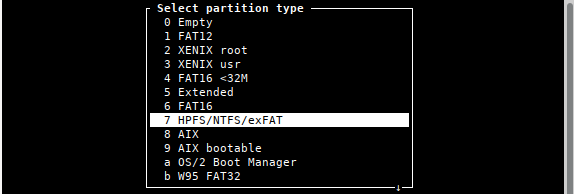
A selection list appears in which the partition type can be selected
with the arrow keys up and
down. In our example, we select “7
HPFS/NTFS/exFAT” for the partitions /dev/sda5 and
/dev/sda6. This way, the above mentioned Windows system
can access the partition.
Make a partition bootable
For Linux there is no need to make a partition bootable, but some other operating systems need it. This is done by highlighting the appropriate partition and selecting the “Bootable” command. (Note: when installing to an external hard drive, a partition must be made bootable.)
Write partition table
When everything has been partitioned, the result can be saved with the command “Write”. The partition table is now written to the disk.

Since this will delete all data on the corresponding
disk/partition, you should be really sure before typing
yes and confirming again with the
Enter key.
Quit cfdisk
By entering the command “Quit”, we can quit the program.
After leaving cfdisk and before the installation, you
should reboot in any case to read in the partition table again.
There are several file systems for Linux that can be used. There are
Ext2, Ext4, ReiserFs,
and for more experienced users XFS,
JFS, and ZFS.
Ext2 may be of interest when accessing from Windows, as
there are Windows drivers for this file system. Ext2 file system for MS Windows
(drivers and documentation).
For normal use, we recommend the ext4 file system. It is siduction’s default file system.
After cfdisk has finished, the root
console is still needed as formatting requires root privileges.
The command is mkfs.ext4 /dev/sdaX. For
“X”, enter the number of the selected partition.
mkfs.ext4 /dev/sda2
mke2fs 1.45.6 (20-Mar-2020)
/dev/sdb2 contains an ext4 file system
    last mounted on Tue May 26 14:26:34 2020
Proceed anyway? (y,N)
The query is to be answered with y if
you are sure that the correct partition should be formatted. Please
check several times!
After the formatting is finished, you should get a message that ext4 was written successfully. If this is not the case, something went wrong during partitioning or sdaX is not a Linux partition. We check with:
fdisk -l /dev/sdaIf something is wrong, you may have to partition again.
If the formatting was successful, this procedure can be repeated for
the other partitions, adapting the command according to the partition
type and the desired file system (e.g.:
mkfs.ext2 or
mkfs.vfat or
mkfs.ntfs, etc.). Please read the man page
man mkfs.
Finally, format the swap partition, in this case sda1:
mkswap /dev/sda1Next, the swap partition is activated:
swapon /dev/sda1After that, you can check in the console if the swap partition is recognized:
swapon -sWith the swap partition mounted, the output of the previous command should look something like this:
Filename Type Size Used Priority
/dev/sda1 partition 8914940 0 -2
We then inform the kernel about the changes with the command
systemctl daemon-reload.
Now the installation can begin.